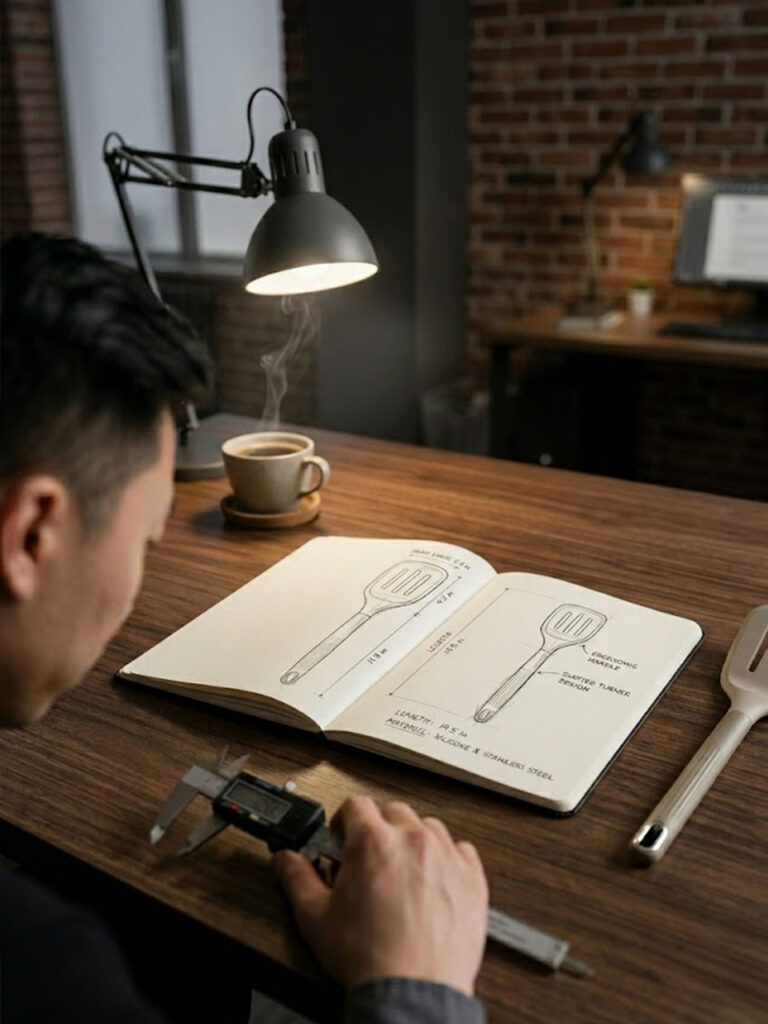
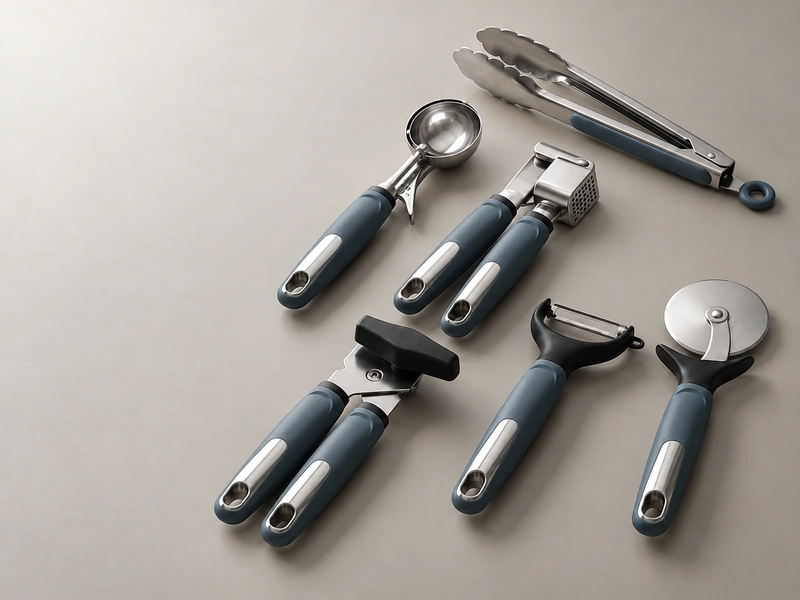
Before a Kitchen Gadget Becomes a Retail Product
A kitchen gadget can look convincing in a sketch and still miss its commercial target. An added function may increase tooling and assembly costs, or push the final price beyond the intended retail channel.
That is why kitchen gadgets OEM/ODM development should begin with the market, not the drawing. The buyer and supplier first need to align the consumer, price position, sales channel, order scale, and launch date.
This guide follows that path from positioning to design, materials, testing, packaging, and production. It helps buyers identify where customization creates value and where it simply adds cost or production risk.
Who This Guide Is For
The guide is written for B2B teams turning a product opportunity into a repeatable retail program. Their decisions affect appearance, margin, compliance, quality consistency, and replenishment.
Brands and Product Development Teams
A brand may have a concept, reference sample, or visual direction but still need engineering and production support. Its main challenge is translating brand intent into measurable specifications.
Successful development preserves the idea that makes the product distinctive while confirming that its structure, materials, finish, packaging, and target cost can work together.
Retailers, Importers, and Sourcing Teams
Retailers often need a coordinated range rather than one isolated SKU. They must consider price architecture, shelf presentation, supplier capacity, inspection standards, and replenishment.
Importers and sourcing teams must compare quotations that may use different materials, construction, testing, or packaging assumptions. A lower unit price is not meaningful until the commercial specifications are comparable.

What Kitchen Gadget OEM and ODM Services Actually Cover
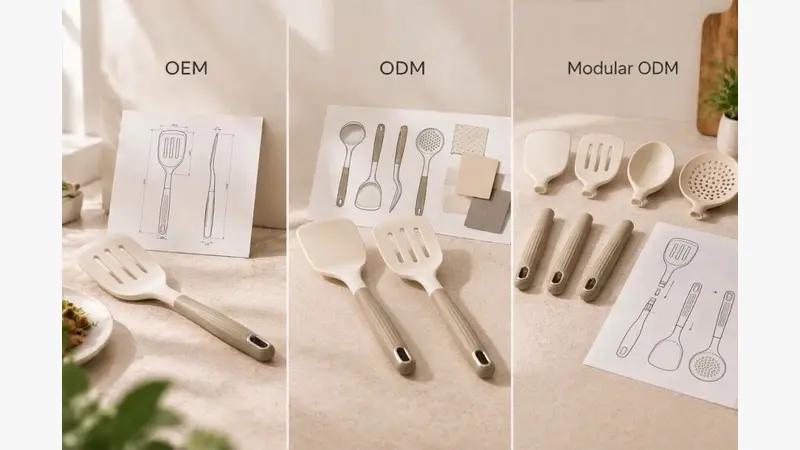
OEM development usually starts with a buyer-controlled drawing, sample, or specification. The supplier reviews manufacturability, materials, processes, tooling, sampling, testing, packaging, production, and delivery against that direction.
ODM involves more development support. A buyer may begin with a consumer need, target price, brand direction, or category opportunity, then work with the supplier to define the product structure. Buyers can review the kitchenware OEM/ODM ordering process before preparing a brief.
OEM, ODM, or a Modular Development Route?
OEM suits projects with a mature design and clear technical ownership. ODM is more suitable when the buyer needs help defining function, construction, materials, or positioning. Neither route removes the need for an approved specification and validation plan.
A modular ODM route sits between basic private labeling and completely new development. It uses proven functional components while selected handles, finishes, colors, logos, and packaging carry the buyer’s brand language.
Start With the Market, Not the Feature List
Before choosing products from a tools and gadgets range, define the user, use scenario, retail channel, and reason for purchase. For example, a shopper choosing air fryers may care most about crispy results and easier cleaning, while a supermarket promotion, specialist kitchen store, and premium e-commerce brand will still not need the same feature set. Slow cookers also serve a clear role for families who want convenient everyday meals.
The team should then work backward from the target retail price. For multifunction pressure cookers that can cook, steam, and slow-cook, the trade-off between feature set and price will differ because retail margin, distribution, freight, packaging, testing, tooling amortization, and product cost all compete for space inside the same commercial model.
This alignment creates a filter for later decisions. When a feature or material is proposed, the team can ask whether it improves consumer value, supports the brand position, and remains realistic for the launch window.
Choosing Product Opportunities by Commercial Role
A promising category should do more than look popular. Buyers need to assess its consumer relevance, price flexibility, differentiation potential, technical risk, return risk, and ability to support future SKUs.
The initial assortment should also give every product a role. A recognizable item may attract attention, a practical repeat-use tool may support volume, and a more distinctive product may communicate the brand’s design or performance position.
Match Price Architecture to the Retail Channel
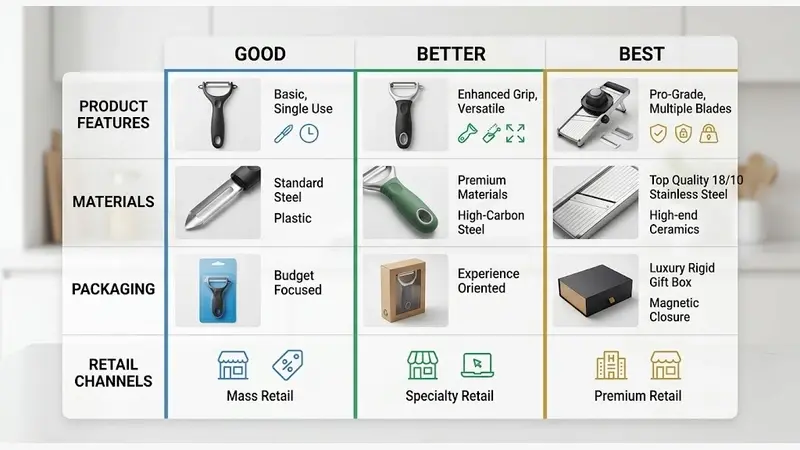
A good-better-best structure helps buyers avoid forcing one specification into every channel. Entry products should protect the essential function, mid-market products can improve materials or ergonomics, and premium products must offer a visible or measurable reason for the higher price so they are clearly positioned as the best.
Channel requirements also change the design brief. Discount retail kitchenware programs normally require tight control of materials, packaging, and production efficiency, while e-commerce kitchenware solutions must communicate functions clearly through images and withstand parcel delivery.
Three Core Product Lines to Validate First
Instant-read thermometers, coffee grinders, and knife sharpeners can give a kitchen gadget range three different commercial roles: precision cooking, beverage preparation, and product maintenance; rice cookers can similarly signal convenience-led appliance opportunities, with some tested models such as Hamilton Beach positioned around speed as the fastest tool for cooking rice. Premium versions may cost hundreds more than low- or mid-range options, so the added value needs to be visible or measurable; review frameworks from serious eats also tend to compare these tools by use case. Each also exposes different technical questions during development.
Instant-Read Food Thermometers
For an instant-read thermometer, define the accuracy, response time, measurement range, display readability, probe movement, and operating controls before comparing quotations. “Fast” or “waterproof” should be converted into testable requirements, especially since an instant-read model’s core value is helping users cook meat safely by checking doneness in seconds.
Prototype reviews should examine temperature consistency and physical durability through repeated readings, calibration checks, wet-hand operation, probe-folding cycles, and realistic drop conditions. The team should also decide whether the product is intended for occasional home cooking or more demanding use. For example, thermapen one-style instant-read tools are also used for bread doneness checks in the oven, so you can verify that both response speed and accuracy meet real baking needs.
Private-Label Coffee Grinders
The first decision is whether the range needs a blade grinder, burr grinder, manual mechanism, or electric system, with options suited to different users, from beginners to experts. In buyer comparisons, a coffee grinder is also commonly judged by grinding accuracy alongside grind consistency, adjustment method, noise, cleaning, durability, price, and user expectations.
A private-label brief should define capacity, adjustment, noise, and cleaning requirements, together with fineness levels and operating time. For electric models, motor performance, heat buildup, controls, and repeated-cycle testing also need early attention, since units such as OXO的咖啡研磨机以准确的研磨效果著称, so validation of these grinder machines should not focus on the motor alone and should also reflect real-use results.
Knife Sharpeners for Home and Commercial Use
Knife sharpeners should be positioned around the intended user rather than the number of sharpening stages. Home users may value simple angle guidance and hand protection, while commercial users may prioritize speed, repeatability, replaceable abrasives, and durability.
The specification should define compatible knives and replaceable components, as well as abrasive materials, sharpening angle, base stability, and whether a suction-based knife sharpener structure improves stability and safety during sharpening, plus left- or right-handed operation. Products positioned alongside other cutting and chopping tools should follow the same safety and packaging logic.
Add Focused Single-Function Items Like Garlic Presses
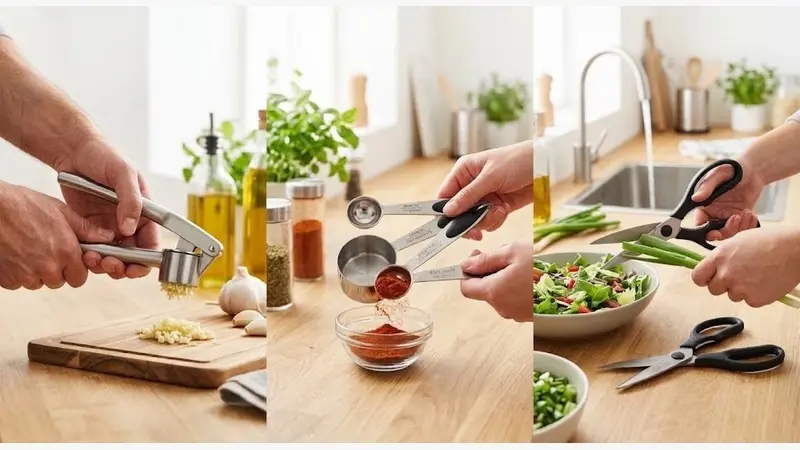
Garlic presses, a measuring cup, measuring tools, a grater, kitchen scissors, and a hand blender can make the range more accessible as single-function cooking tools that often fit more easily into everyday kitchen repeat purchases. Their familiar functions are useful, and a few well-chosen single-function items can sell repeatedly, but differentiation should come from better task execution, not decorative complexity alone.
A garlic press can improve leverage and cleaning access; measuring tools can use clearer, more durable markings; and kitchen scissors can improve blade alignment, grip safety, or separation for cleaning. For a hand blender, five speed settings can create a clear, easy-to-feel difference in control during use. Each improvement should remain easy to understand at the point of sale, because those are often the things shoppers notice first. A countertop model is also better suited to large-batch drinks, so different appliance types need different positioning logic.
Prioritize Prototypes That Test the Biggest Risks
Do not prototype only the easiest products first. Prioritize the items with the greatest uncertainty in performance, mechanism, cleaning, electronics, tooling, or compliance, because they can determine whether the wider launch plan remains realistic.
A balanced first round could include one electronic product, one mechanical product, and one simpler single-function item. Comparing them together helps the team validate the range before expansion, including its price architecture, design language, packaging direction, and approval process.
Design for Manufacturability Before Tooling
A concept should be reviewed as a system of parts, processes, and tolerances before tooling begins. The key question is not only whether the product can be made once, but whether it can be assembled, inspected, and repeated at the target cost.
The review should map every component, connection, finish, and manual operation. It should also identify areas where variation could affect alignment, movement, appearance, or cleaning, as illustrated by this complex kitchen gadget development case.
Separate Core Value From Decorative Complexity
Product teams often add functions and visual details during early development. Every addition should be tested against the core user benefit, brand message, price band, and launch schedule.
A feature deserves investment when buyers can explain what it improves. If it adds parts, tooling, assembly, or inspection work without strengthening use or market positioning, the team should simplify it or find a more production-efficient solution.
Field Experience: Engineering a Decorative Insert
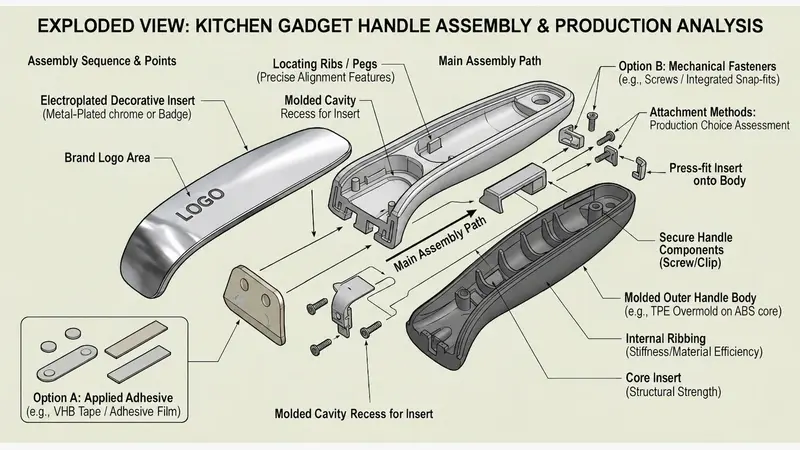
In l-tools project work, an electroplated decorative insert is a useful example. The insert may strengthen a product’s visual identity, but its attachment method can introduce extra parts, manual placement, alignment variation, and surface-damage risk.
Before selecting the structure, we align with the buyer on the target price, brand position, core expression, and planned launch date. We then compare attachment options according to appearance, tooling, assembly steps, tolerance control, inspection access, and expected production cost.
Design for Use and Easy to Clean
Manufacturability should not reduce usability. Handles, controls, joints, and removable parts must be reviewed through realistic movements, including wet-hand operation, repeated force, the product’s size, and the steps required to clean and reassemble it.
Simple actions are easier to communicate and test. A reusable silicone storage bag is another easy-to-clean, storage-oriented example, and being microwave- and dishwasher-safe makes it more practical for daily use. Where possible, use one-button, one-direction, or single-action operation, but do not simplify a mechanism so far that safety, control, or durability suffers. Usability also includes storage efficiency; for example, Joseph Joseph cutting boards use space-saving formats that make them easy to store.
Test the Gaps Users Actually Touch
Food residue often collects around hinges, seams, pressing baskets, blade connections, decorative inserts, or overlapping materials. A product may function correctly and still create a poor experience if users cannot see or reach these areas.
During a kitchenware sample review, apply realistic residues and follow the intended washing method. Record removal steps, inaccessible gaps, drying problems, and whether repeated disassembly could damage locks or fitted components.
Specify Stainless Steel by Use, Not by Label
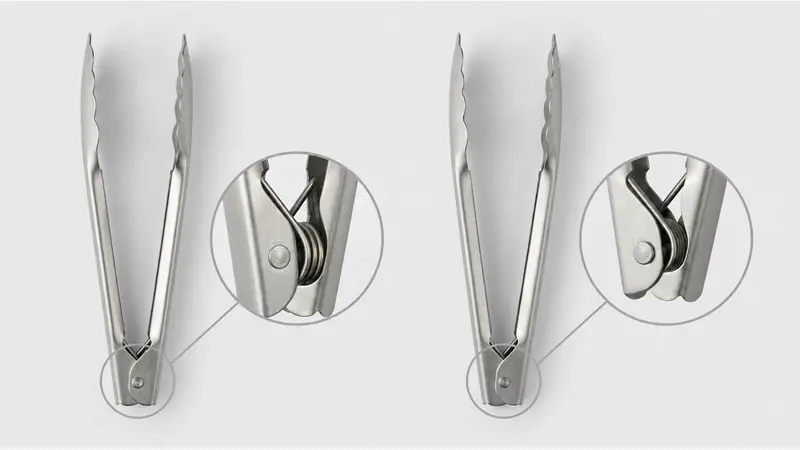
A stainless steel grade alone does not define product performance. The specification should connect grade, thickness, hardness, forming process, edge condition, strength, corrosion exposure, and cleaning method to the actual component.
A blade, spring, handle shell, shaft, and decorative plate perform different jobs. Using one rule for every part can add unnecessary cost in one area while leaving another component too flexible, wear-prone, or difficult to manufacture.
Connect Surface Finish to Testing and Traceability
Polished, brushed, bead-blasted, coated, and electroplated surfaces differ in appearance, scratch visibility, fingerprinting, cleaning, and production control. Approve the finish on the actual geometry because a flat sample plate may not reproduce the same result on formed parts.
The approved specification should connect the finish to a physical reference, process description, supplier, and material batch. Incoming checks and change control then help prevent an approved surface from drifting when materials, polishing media, coating conditions, or subcontractors change.
Turn Compliance Claims Into a Product-Specific Test Plan
“Food grade” is not a complete specification. A useful compliance brief identifies the destination market and actual use conditions, including every material and coating, food type, contact temperature and duration, repeated use, and cleaning method.
The team should separate regulatory evidence from performance evidence. A migration report may support a food-contact requirement, but it does not prove that a handle, joint, display, blade, or coating will survive the product’s intended use.
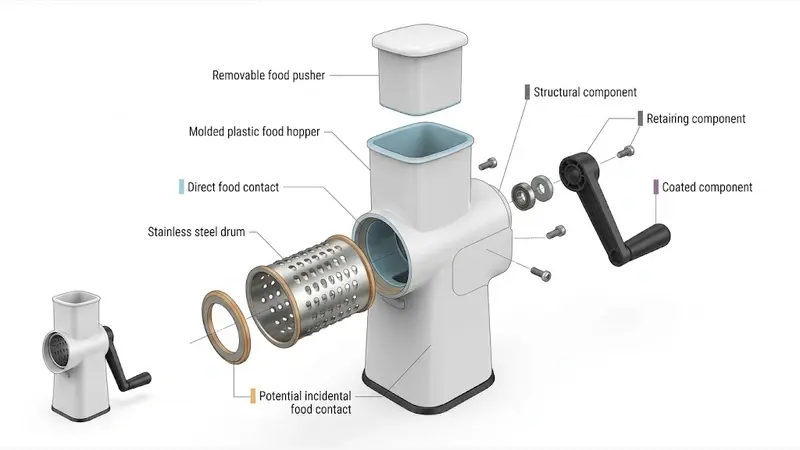
Map Food Contact at Component Level
In l-tools projects, we review each structural component according to how it is actually used. We identify direct contact, foreseeable indirect contact, contact time, temperature, moisture, oil, acidity, and repeated washing before defining the material and test plan.
This prevents one broad claim from being applied to unrelated parts. A food-contact head, internal frame, grip layer, adhesive, printed marking, coating, or decorative insert may require different component-specific evidence.
Choose Requirements by Destination Market
For the United States, do not treat “FDA compliant” as one generic finished-product certificate. The FDA explains that a material’s status depends on its component substances and their intended use, as detailed in its guidance on individual components of a food-contact material.
For the European Union, begin with the European Commission food-contact legislation, then identify material-specific rules and applicable national requirements. Products intended for Germany may also require review against the official German Food and Feed Code, or LFGB, depending on their materials and intended use.
Build Quality Control Around Product Risk
Quality control should begin with the approved specification, not a generic checklist. Critical characteristics may include dimensions, movement, accuracy, cutting or grinding performance, corrosion resistance, markings, finish, packaging, and product-specific safety features.
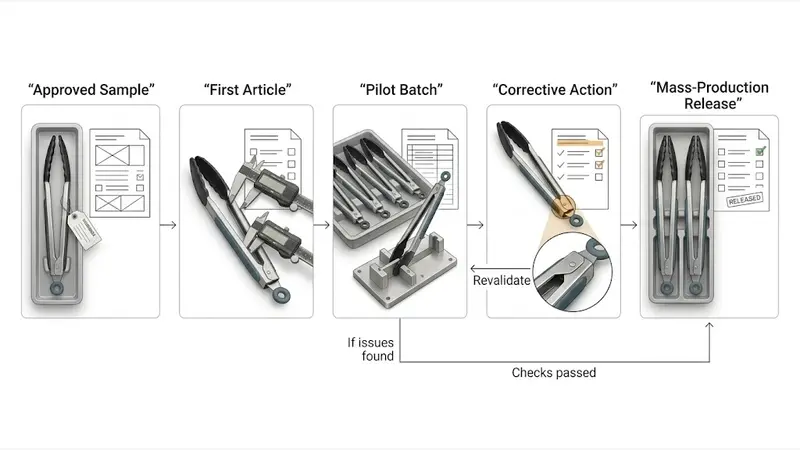
Use incoming, first-article, in-process, and final inspections for different purposes. Incoming inspection confirms materials, first-article inspection checks production setup, and later inspections verify that the batch remains within agreed limits.
Define Batch Inspection and Supplier Audit Frequency
The inspection plan should state sampling method, defect categories, acceptance criteria, test frequency, reference samples, and escalation rules. A cosmetic variation and a safety-related failure should not trigger the same decision or corrective action.
Audit frequency should follow supplier and process risk, not a fixed calendar alone. New suppliers, new tooling, repeated defects, material changes, subcontracted processes, or major volume increases justify closer review.

Validate Samples Before Mass Production
A visually approved sample proves only that one acceptable unit has been produced, and it should not be treated as the final pick. Approval should also define test methods, measurable limits, materials, dimensions, finishes, packaging status, and the process used to reproduce it. For example, if a product claim is that an ice cream maker can make ice cream in minutes, the sampling plan should verify both cycle time and result consistency. The same logic applies to an immersion circulator, where checks should confirm stable water-bath temperature over time, and to a vacuum sealer, where sealing integrity and paired-use performance also need verification.
Functional and durability tests should reflect the real failure mode of each product. This silicone kitchenware heat-test case shows why raw-material assumptions and finished-product structural performance must be evaluated separately.
Use Pilot Production to Test Repeatability
Pilot production tests production repeatability under normal tooling, operators, cycle times, and component variation. Track assembly time, process settings, defect patterns, functional ranges, packaging fit, and material yield.
If results drift, investigate the relationship between component tolerances and process conditions before changing the complete design. The objective is to create a controlled production window, not to select one unusually good unit.
Prepare Capacity, Materials, and Release Records
Before release, confirm long-lead materials, tooling readiness, supplier capacity, inspection resources, packaging availability, and change-control responsibilities. Keep the approved sample, drawings, bill of materials, test reports, inspection criteria, and corrective actions together so production and quality teams work from the same evidence.
Build a Private-Label Range Without Overbuilding
Private-label differentiation does not require every SKU to start with new tooling. Buyers should first decide where differentiation creates value: color, finish, logo, packaging, handle design, or product structure. This keeps visible brand elements separate from changes that affect function, compliance, and manufacturing risk.
Create a change matrix showing the MOQ, tooling, validation, and lead-time effect of each option. A new color or printed sleeve may be relatively quick, while a small change to a joint, blade, motor housing, or food-contact part can trigger new samples, tests, and production controls.
Field Experience: RangeBuilder Modular ODM
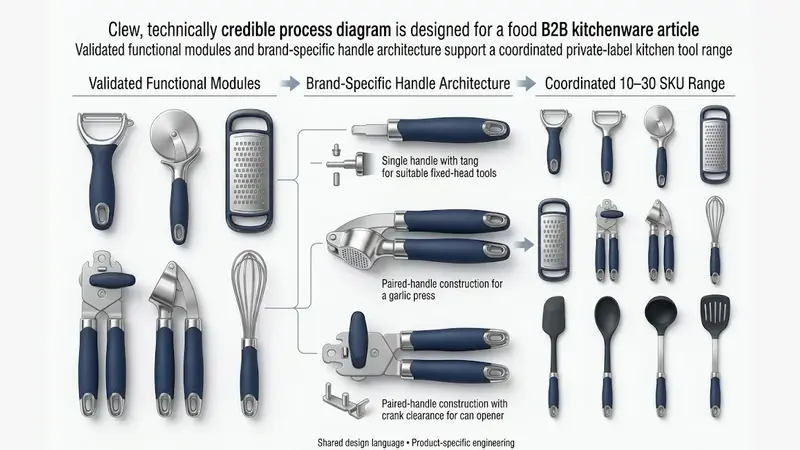
For smaller orders and faster line validation, l-tools developed RangeBuilder, a modular ODM kitchen tool development platform. Instead of redesigning every function, the project starts with previously validated functional components and selects material levels that fit the buyer’s channel, price position, and performance target.
The buyer’s brand DNA is then translated into a dedicated handle architecture and connecting details. Where product structures are compatible, one design language can extend across approximately 10 to 30 SKUs, concentrating new investment on handles and necessary connections rather than complete redevelopment; suitability still has to be reviewed item by item.
Use Six Gates From Definition to Scale
The workflow begins with DEFINE, MATCH, and CREATE: define the consumer, channel, target cost, and launch window; match suitable functions and material levels; then create the shared visual language. These gates stop styling decisions from moving ahead of the commercial brief.
BUILD, VALIDATE, and SCALE turn the concept into working samples, verify function and manufacturing feasibility, and expand only after representative products pass review. This sequence can reduce unnecessary tooling exposure and make SKU expansion more efficient, but it does not replace product-specific testing or compliance checks.
Prepare Packaging and the Launch Sequence
Packaging should be developed while samples are still changing, not after the product is approved. As explained in this guide to how kitchenware packaging affects product sales, the pack must support protection, communication, channel fit, and range consistency at the same time.
Review the assembled pack, including the insert, hang card or box, barcode, required languages, claims, warnings, and master-carton arrangement. Shelf presentation and transport protection should be assessed against the primary retail route, because a large window that works in-store may create a weak point in parcel delivery.
Launch the range in controlled stages: approve two or three representative SKUs, complete testing and pilot production, then release the initial assortment before adding more items. A coordinated collection such as the PURE kitchenware collection illustrates how materials, colors, products, and packaging can work as one retail system.
Set Project Milestones and Ownership
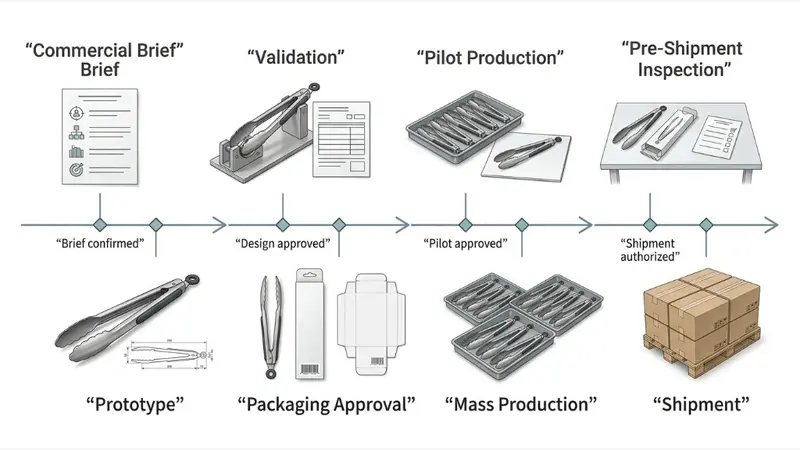
A workable schedule should include the commercial brief, concept approval, engineering review, prototype, functional testing, compliance review, packaging approval, pilot production, first-article inspection, mass production, pre-shipment inspection, and delivery. Each gate needs an owner, required evidence, and written approval.
Plan backward from the shelf or campaign date and reserve time for sample revisions, laboratory testing, artwork correction, and material preparation, with milestones set early to avoid wasting money on ineffective rework. The kitchenware OEM and ODM ordering process can help teams align buyer decisions and supplier deliverables before production begins.
Plan After-Sales Evidence Before Shipment
Define warranty scope, return and replacement rules, complaint channels, and response ownership before shipment. Keep SKU, batch, material, inspection, and test records linked so the team can distinguish an isolated user issue from a repeatable production or design problem.
Complaint reviews should record the failure mode, use conditions, batch, and evidence before deciding on corrective action. For products with wear parts, such as grinder burrs or sharpener modules, replacement availability and clear instructions can also reduce unnecessary full-product returns.
From Product Idea to a Retail-Ready Range
A successful kitchen gadget program connects market position, product architecture, material choices, cleanability, compliance, testing, packaging, and production control—and not every feature needs to do everything when the full system is aligned. When those decisions follow defined gates, brands and retailers can build a focused first assortment, learn from real results, and expand without losing quality or design consistency.
Explore Your Next Kitchen Gadget Project With l-tools
Explore l-tools kitchen tools and gadgets or contact l-tools to discuss your project. Share your target market, channel, price tier, priority categories, estimated quantity, and launch date, and the team can assess whether OEM customization, modular ODM development, or a new product platform is the most practical route.